Posts

Fixing a broken Fossil charging dock cable

Image
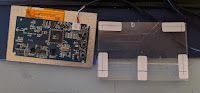
My other half somehow managed to break the USB connector from the cable of the Fossil Smartwatch Charging Dock.  It seemed that the cable itself only exposed two wires in the lead, which suggested that it could be easily fixed:  I couldn't find anyone with this same issue on the internet as I vaguely recollect the watch can be connected to USB for debugging purposes and USB data requires more than 2 wires...  I may have remembered that wrongly, but I figured I had to open up the connector to make sure that it is indeed just a two wire connection.  The connector itself was a bit of a pain to get into. After prying the silicon sleeve from the connector I could see just two connections: GND and VCC. So far, so good... I had to use a pair of snips to get the transparent protective plastic off so I could get at the actual contacts: Luckily, there's a pad marked "GND" on the tiny board, so I could easily figure out how to connect these two leads back on the PCB.  I added a

Commodore 64 Displaysette? LCDSette?

Image
I bought a relatively cheap LCD screen from AliExpress to use with a C64 project I'm working on. It came without a case and as I am not one of those fortunate guys with a 3D printer, I had to think of another way to make a decent case for the screen. I noticed the dimensions are very close to an old school compact cassette case, so I decided to use that. Step 1 -- Mark where to cut The PCB must fit inside the case -- so to make room for it, I needed to cut a rectangle from the case. I could have opted to modify the case so the screen fits inside , but I did not have any cases without scratches. Step 2 -- Cut the case I used a Dremel to cut the rectangle from the case. NOTE: Always wear protective glasses when cutting plastic, it may damage your sight if you get small bits of plastic in your eye. Step 3 -- Glue the screen I used UV hardening epoxy to glue the screen to the case. Step 4 -- Put it together Here is a picture of the screen connected to my

C64 font for Arduino OLED libraries

I created some header file a long time ago so I can see the C64 font on the OLED display connected to my Arduino based projects. Back then, I just thought it would look nicer than all the other fonts. And it did not disappoint. :) I had grabbed the character data from the ROMs and mapped relevant characters to ASCII. I also had to add a few other characters to fully support the 32-127 range of the ASCII set, and added some custom characters that I found useful at the time. I just re-discovered my old work and decided to throw it up on Github, you can check it out here: https://github.com/hugovangalen/C64_Font8x8 This files do not contain the graphic characters. I didn't need those at the time and considered them unnecessary bloat.

RetroUSBJoystick - connect your old-school C64 joystick via USB (updated 2020-01-22)

I quickly put some code together so I will be able to connect my old-school joystick to the TheC64 when it finally arrives. (And so I can wear down the joystick and eventually break it while playing Decathlon. Just like the good old days. :-D) It requires an Arduino Pro Micro, a Leonardo or other Arduino-like boards that are based on the ATmega32u4 (those are the ones with native USB support). I have put the code up on Github -- you can check it out right here: https://github.com/hugovangalen/RetroUSBJoystick Update January 9th, 2020 It is now also possible to connect joystick wirelessly by using NRF24L01 transceiver modules. This requires an additional Arduino board. The updated code has been pushed to the Github repository linked above. Check the included README for further instructions on how to get things going. Update January 16th, 2020 I discovered earlier the TheC64 did not see the device as a valid joystick... After some more research, I found a fix for this by s

105 for the Commodore 64 (updated 2021-08-15)

Image
105 is a simple game that I wrote for the Commodore 64. It is written in assembly (machine code) that I have recently gotten in to. (I did have a C64 in the 80s, but only dabbled in BASIC back then.) I'll try to briefly explain the aim of the game. The game has similarities with Blackjack, where the goal is to score 21. In 105 though, there are 5 piles of cards to reach 21 on. (Observant readers probably already noticed that 21 times 5 is 105.) You can find the download below. How to play A card is taken from a shuffled deck and you need to choose on what pile it should go. You can do this with the keys 1 to 5, or using the joystick left, right and fire. But hurry, because you only have 10 seconds to choose! The goal is to score as many points as possible and beat your own, or other players' scores in the hi-scores. Screenshot created with VICE A total of 98 or higher will allow you to collect points (105 obviously giving you most points) to add to your runni

Under construction...

"coming soon"